Temporarily Allow Someone to Upload to an Ssh Server
Fix your first SSH keys
Use SSH keys for authentication when you are connecting to your server, or even betwixt your servers. They can greatly simplify and increase the security of your login process. When keys are implemented correctly they provide a secure, fast, and easy style of accessing your cloud server.
Follow our guide and learn how to prepare your first SSH keys for authentication using OpenSSH or PuTTYTray.
Try UpCloud for free! Deploy a server in simply 45 seconds
Preparing your server
To add an SSH primal pair, showtime, create a hidden folder to your user business relationship abode directory on your cloud server with the following command.
mkdir -p ~/.ssh
So restrict the permissions to that directory to just yourself with the command below.
chmod 700 ~/.ssh
This creates a secure location for you to salvage your SSH keys for authentication. Yet, note that since the keys are stored in your user home directory, every user that wishes to connect using SSH keys for authentication has to echo these steps on their own profile.
Using OpenSSH to generate a key pair
Now go on on your own figurer if yous are using Linux or whatever other Bone that has OpenSSH. PuTTY users should skip to the next section.
1. Generate a new key pair in a last with the side by side command
ssh-keygen -t rsa
The key generator will ask for location and file proper noun to which the key is saved to. Enter a new name or use the default by pressing enter.
2. (Optional) Create a passphrase for the key when prompted
This is a simple countersign that will protect your private key should someone be able to get their hands on information technology. Enter the password yous wish or go along without a password. Press enter twice. Note that some automation tools might not be able to unlock passphrase-protected private keys.
three. Copy the public half of the key pair to your deject server using the following control
Replace the user and server with your username and the server address you wish to use the cardinal authentication on.
ssh-copy-id -i ~/.ssh/id_rsa.pub user@server
This too assumes y'all saved the key pair using the default file name and location. If not, just replace the key path~/.ssh/id_rsa.pub above with your ain central name.
Enter your user account password for that SSH server when prompted.
You can at present authenticate to your server with the key pair, but at the moment yous would need to enter the passphrase every fourth dimension you connect.
four. (Optional) Prepare SSH Agent to store the keys to avoid having to re-enter passphrase at every login
Enter the post-obit commands to start the agent and add together the private SSH key.
ssh-agent $Bash ssh-add ~/.ssh/id_rsa
Type in your key's current passphrase when asked. If you saved the private cardinal somewhere other than the default location and proper noun, you'll accept to specify it when adding the key.
Later on, you tin connect to your deject server using the keys for authentication, and merely having to unlock the key by repeating the final two steps in one case after every estimator restart.
Using PuTTYTray to generate a central pair
If you are running Windows and PuTTYTray for SSH, you can use the built-in key generator from PuTTY to create a new key pair.
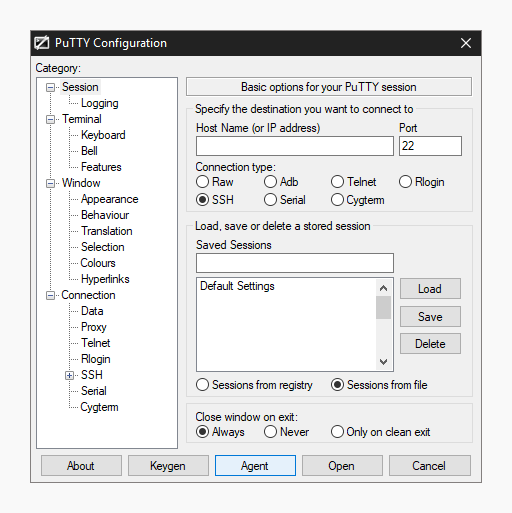
i. Click theKeygen push button at the bottom of the PuTTY Configuration window to become started.
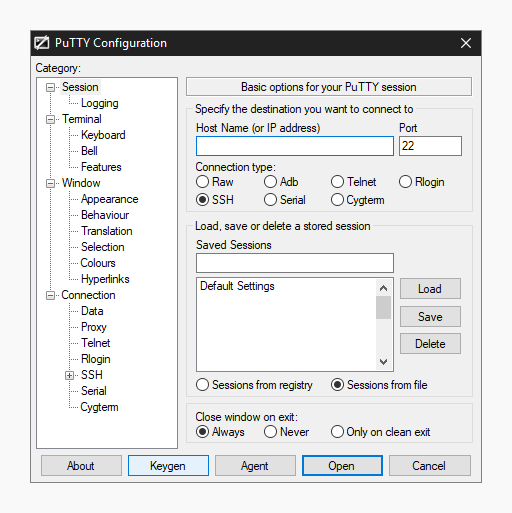
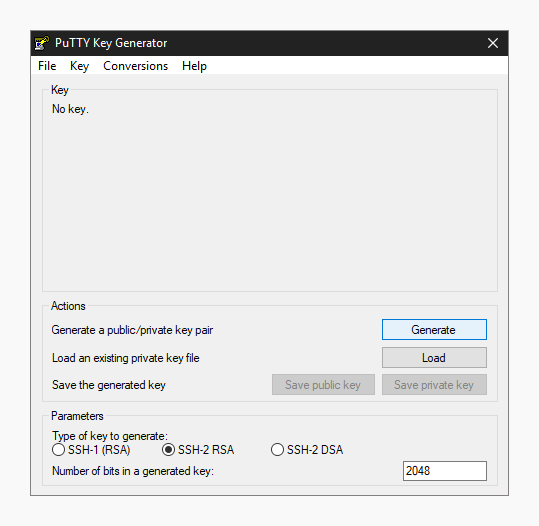
Then in the Cardinal Generator window, check that the Blazon of key to generate at the bottom is ready to SSH-2 RSA. The older SSH-1 was the first version on the standard merely is now generally considered obsolete. Most modern servers and clients back up SSH-2.
two. Click the Generate button to begin.
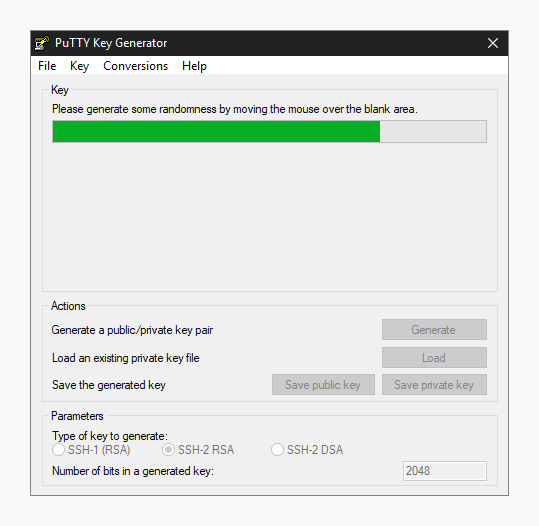
3. Keep moving your mouse over the blank area in any style to help generate randomness for a few moments until the progress is complete.
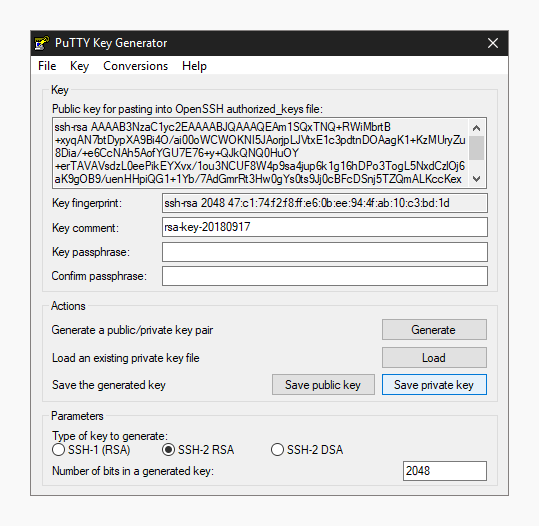
With the keys finished, PuTTY volition prove the relative information about the pair along with the public key for easier copying.
4. (Optional) Enter a key passphrase in the two empty fields for the added security before continuing. The passphrase will protect your key from unauthorized use should someone be able to copy it. All the same, some automation tools might not exist able to unlock passphrase-protected private keys.
5. Click the Salve private key button and store it somewhere safe. Generally anywhere in your user directory is fine as long every bit your PC is password protected. Earlier closing the keygen, you lot may want to copy the public key to your clipboard, but yous can e'er get it after as well.
Now that you have a new primal saved on your figurer, you lot'll need to import information technology into the PuTTY cardinal amanuensis.
6. Click the Agent button to open the central manager in the PuTTY Configuration window.
7. ClickAdd Key push button in the Key List, then browse to the location y'all saved the individual fundamental, select it and click Open.
Enter your key passphrase if asked.
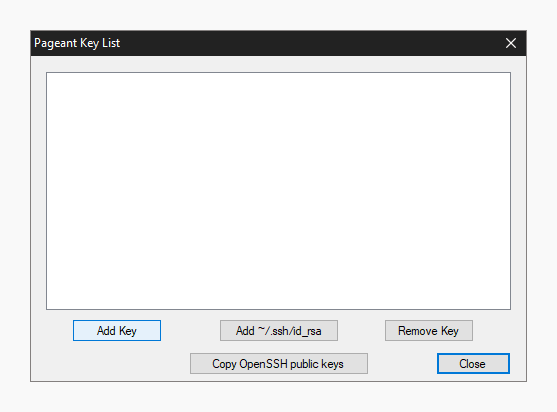
This will import the key to your PuTTY client, but you still need to copy the public central over to your server.
8. Open an SSH connection to your cloud server and go to the SSH central directory.
cd ~/.ssh/
9. Open or create the default file OpenSSH looks for public keys called authorized_keys.
sudo nano authorized_keys
10. Paste the public cardinal into the file by merely correct-clicking the SSH client window. Brand sure the central goes on a single line for OpenSSH to be able to read information technology. Annotation that the central type needs to likewise be included, ssh-rsa as shown in the example beneath.
ssh-rsa AAAAB3NzaC1yc2EAAAADAQABAAABgQDEeV/UKOVqNUwmED8PO1E6wY3ITEbWx30rAgGudzTGnYI8fB176nlmIS+O01vaI4fMYwO9Chg3mzVT2+4AkTBm1sXnDdzhNNnkclipMXdmAHnRtzU9kREFZU0/yyOhorzqxWBi0LQxpjTAZawi+8ysH7PGnNlX3FUObZcmHis0oD/C7ll6DwX4WVSjh2JGcaIhbhB+sovxW5duTDqyuyKpRsbyBD0+wNjSuJFjh5MnXJqcqrEUaPRoe2wQ9k7q0K2KOXAmYYPUWrLY6N+jjYdnkyP9XWWkz6c7Qvx7m/dBfgpyJbPryWbSZ8PsvSgtDTIND/jNfwmgQjOCGgsZlmCsvRIixzh2uNmFCg75wyD6f/wdZ5gq1HPFdyLblHs46P9ClfMbWJt9APx7c1SRE+qMbdLf/five/vNGiGHr6bBXKRX70+XODl04shFQpjm1kKkG9qHkp3bOSot4Da987dRHMhAbd0d3QdS8wCg7s6NPk4qDVnR6BCxiM2vbOD1B4gWQ8= [email protected]
When you lot've copied the public key over to the authorized keys list, save the file and go out the editor. Y'all tin now test the public key authentication by logging in to your server again. You should not become asked for your password, but instead logged straight in with the primal. If it'south non working, check that your private primal is unlocked at your SSH Amanuensis and attempt again.
Turn off password hallmark
With SSH fundamental hallmark configured and tested, you can disable password authentication for SSH all together to forbid brute-forcing. When logged in to your cloud server.
1. Open the SSH configuration file with the post-obit command.
sudo nano /etc/ssh/sshd_config
two. Set the password authentication tono to disable clear text passwords.
PasswordAuthentication no
iii. Check that public cardinal authentication is enabled, merely to be safe and non go locked out from your server. If you do detect yourself unable to log in with SSH, you tin can always employ the Web terminal at your UpCloud control panel.
PubkeyAuthentication yes
And so relieve and exit the editor.
4. Restart the SSH service to use the changes by using the control below.
sudo systemctl restart sshd
With that done your cloud server is now another stride forth towards security. Malicious attempts to connect to your server will results in authentication rejection, every bit obviously passwords are not immune, and beast-forcing an RSA cardinal is practically incommunicable.
Conclusions
Recollect to always keep your private keys rubber. Y'all can use the same key from multiple computers if yous wish, or generate new ones on each client connecting to your deject server for added security. Each user should generate their ain key pair and passphrase for secure access control. With proper direction, fifty-fifty in case one of the private keys gets compromised you won't have to replace them all.
Source: https://upcloud.com/community/tutorials/use-ssh-keys-authentication/
0 Response to "Temporarily Allow Someone to Upload to an Ssh Server"
Enregistrer un commentaire